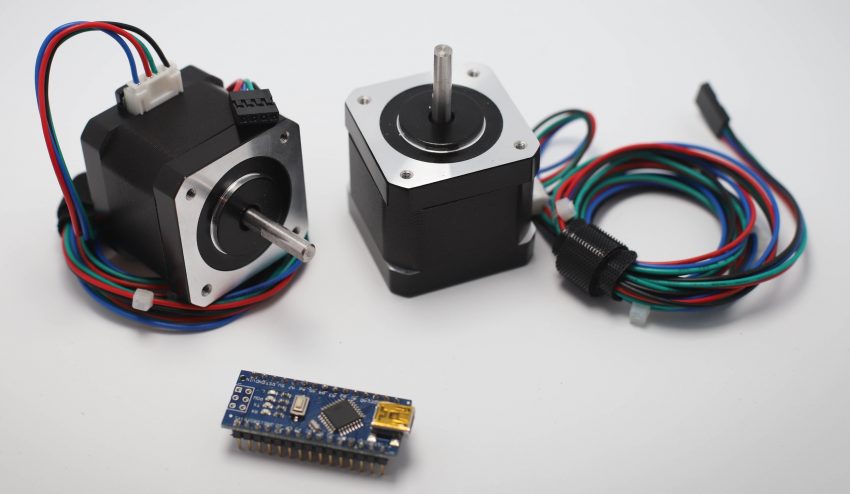
I work with stepper motors a lot. My projects typically include multiple motors running off of a single microcontroller. Everything is great when you’re running all of them at the same speed.
But what if you need each motor to run at a different speed? at a different time? or you need to do something else while your motors are running?
I will show you my solution.
Materials used:
- Arduino Nano
- (2) A4988 Stepper Driver
- (2) Stepper motor
- Breadboard
- 12V DC Power input
- LM7805 Voltage Regulator (5v)
- Jumper wires
The LM7805 is not necessary, as you could make use of the Arduino’s builtin voltage regulator. Practically any stepper driver and motor combination should also work.
Note: The code samples below have a minimum amount of extra code for easier understanding. The code running in the videos have a few extra statements used for demonstration purposes.
1. The Basic Single Motor
#define PUL_PIN 2  // Pulse Pin (sometimes called a step pin)
#define DIR_PIN 3  // Direction Pin

// Steps per revolution of my motor/driver combo
int stepCount = 200;

void setup(){
    pinMode(PUL_PIN, OUTPUT);
    pinMode(DIR_PIN, OUTPUT);

    digitalWrite(DIR_PIN, HIGH);
}

void loop(){
    for(int i=0;i<stepCount;i++){
        digitalWrite(PUL_PIN, HIGH);
        delayMicroseconds(800);
        digitalWrite(PUL_PIN, LOW);
        delayMicroseconds(800);
    }

    delay(1000);
}
This is the starting point of my stepper code. It uses two Arduino pins to output a pulse signal and direction signal to the motor driver, an A4988. An 800 microsecond delay is used between pulses to regulate the stepper motor speed.
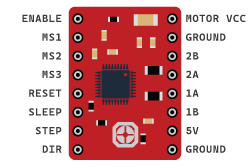
A4988 stepper driver – Cheap and great for breadboards.
- 3.3v or 5v logic
- 1/2, 1/4, 1/8, and 1/16 microstepping
- 35v 1.2A max
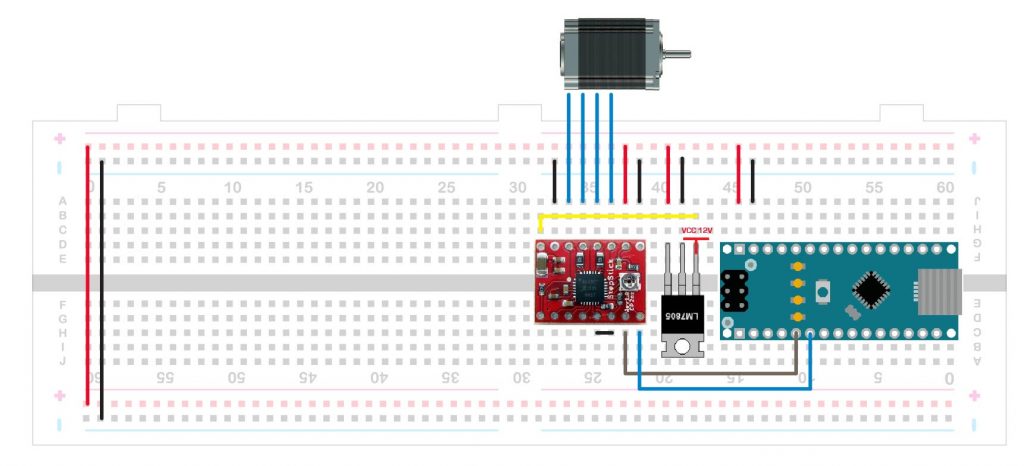
Good stepper motors and drivers will deliver fast, smooth rotation. Conversely, cheap drivers or under-powered motors will stall the faster you try to go.
There will always be a tradeoff between price and performance, as well as dealing with any power or thermal constraints.
2. Two Motors in Tandem
#define PUL1_PIN 2
#define DIR1_PIN 3
#define PUL2_PIN 4
#define DIR2_PIN 5

int stepCount = 200;

void setup(){
    pinMode(PUL1_PIN, OUTPUT);
    pinMode(DIR1_PIN, OUTPUT);
    pinMode(PUL2_PIN, OUTPUT);
    pinMode(DIR2_PIN, OUTPUT);

    digitalWrite(DIR1_PIN, HIGH);
    digitalWrite(DIR2_PIN, HIGH);
}

void loop(){
    for(int i=0;i<stepCount;i++){
        digitalWrite(PUL1_PIN, HIGH);
        digitalWrite(PUL2_PIN, HIGH);
        delayMicroseconds(800);
        digitalWrite(PUL1_PIN, LOW);
        digitalWrite(PUL2_PIN, LOW);
        delayMicroseconds(800);
    }

    delay(1000);
}
Adding another stepper motor is a simple matter of assigning two more output pins for the new motor and driver.
Within the loop(), both motors are pulsed HIGH and then pulsed LOW in tandem, allowing each motor to rotate.
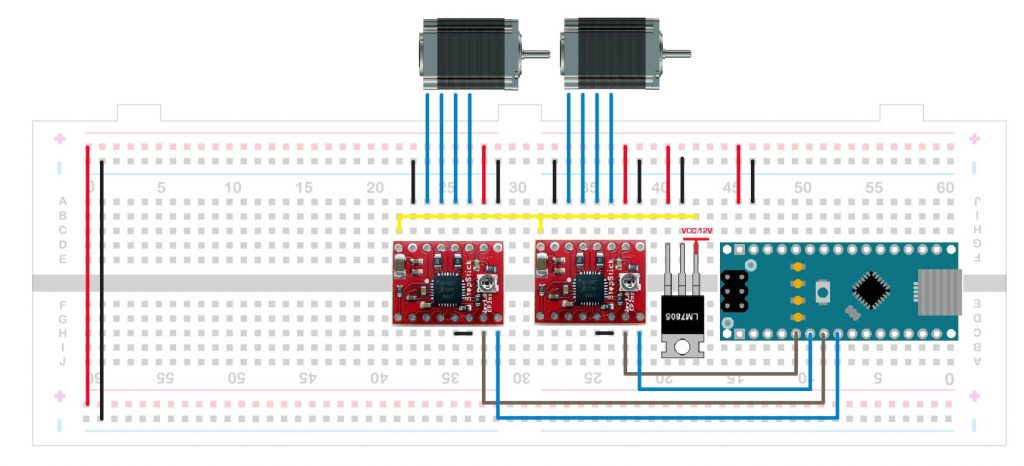
The biggest problem with running stepper motors this way is delayMicroseconds() runs in “blocking” fashion, meaning the rest of the program cannot continue executing until the delays are finished.
The stepper motors will need a different timing scheme.
3. A better way: micros() and a C++ Class
The wiring is the same from the previous example. Rather than delayMicroseconds(), the micros() function is used for timing. Unlike delayMicroseconds(), micros() does not artificially delay execution. It only returns the program’s total execution time in microseconds which is used to trigger events based on predefined intervals.
Each stepper motor will need to store and track the passage of time returned by micros() and trigger appropriate run states defined by the program.
To make adding and controlling stepper motors easier, a C++ class is ideal for keeping code tidy.
#define PUL1_PIN    2
#define DIR1_PIN    3
#define PUL2_PIN    4
#define DIR2_PIN    5

class stepperMotor{
  public:

  void stop(void){
    enable = 0;
  }

  void start(void){
    enable = 1;
  }

  void init(int _pulsePin, int _dirPin, unsigned long _delayTime, bool _direction){
    pulsePin      = _pulsePin;
    dirPin        = _dirPin;
    delayTime     = _delayTime;
    direction     = _direction;

    togglePulse   = LOW;
    enable        = 0;

    pinMode(pulsePin, OUTPUT);
    pinMode(dirPin, OUTPUT);
  }

  void control(void){
    currentTime = micros();
    digitalWrite(dirPin, direction);
    if(enable == 1){
      if( (currentTime - deltaTime) > delayTime ){
        pulseCount++;

        // Each HIGH or LOW is a "pulse"
        // But each step of the motor requires two "pulses"
        if(pulseCount % 2 == 0){
          stepCount++;
        }

        togglePulse = togglePulse == LOW ? HIGH : LOW;
        digitalWrite(pulsePin, togglePulse);
        deltaTime = currentTime;
      }
    }
  }

  void changeDirection(bool _direction){
    direction = _direction;
  }

  unsigned long steps(void){
    return stepCount;
  }

  void changeSpeed(unsigned long _speed){
    delayTime = _speed;
  }

  private:
  unsigned long delayTime, deltaTime, currentTime;
  unsigned long pulseCount = 0;
  unsigned long stepCount = 0;
  int pulsePin, dirPin;
  bool direction, togglePulse, enable;
};

stepperMotor stepperOne, stepperTwo;

void setup() {
  stepperOne.init(PUL1_PIN,DIR1_PIN,1000,HIGH);
  stepperTwo.init(PUL2_PIN,DIR2_PIN,1000,HIGH);
  stepperOne.start();
  stepperTwo.start();
}

void loop() {
  stepperOne.control();
  stepperTwo.control();

  if(stepperOne.steps() == 2000){
    stepperOne.changeDirection(LOW);
    stepperOne.changeSpeed(600);
  }
}

4. The ‘stepperMotor’ class
Declaring stepper motors:
stepperMotor stepperOne, stepperTwo;
Initializing each motor:
stepperOne.init(PUL1_PIN,DIR1_PIN,speedOne,HIGH);

// int            Pulse Pin signal from Arduino
// int            Direction Pin signal from Arduino
// unsigned long  Delay (speed, smaller number is faster)
// bool           Stepper motor direction
The PUL_PIN and DIR_PIN will have to be defined either in your code or passed as a literal pin number to the init() function. The unsigned long ‘speedOne’ can also be literal, but it’s best to keep it as variable to allow for other functions to change this value on the fly. The last argument is a boolean HIGH/LOW for the stepper motor direction.
Start and Stop:
stepperOne.start();
stepperOne.stop();
These two functions trigger the run state of the stepper by changing the boolean enable. By default, the motors are not enabled and have to be enabled with start() inside setup().
Looping:
stepperOne.control();
This is the main control function of the stepper motor. It needs to be placed either in your main loop(), or embedded elsewhere in your control logic.
Changing direction:
stepperOne.changeDirection(HIGH);
Changes the direction of the stepper based on a boolean HIGH/LOW value. Depending on your application, changing direction may need to be sandwiched between the stop() and start() functions.
Changing speed:
stepperOne.changeSpeed(800);
Counting steps:
stepperOne.steps();
Returns an unsigned long of the total number of steps taken since the program started. This counts total steps and not steps relative to the starting position. You can modify the code to count steps up or down depending on clockwise or counterclockwise movement.
5. We need to go deeper
Taking it one step further, I’ve connected an ATtiny85 to a 74HC595 shift register which is used to drive four stepper motors.
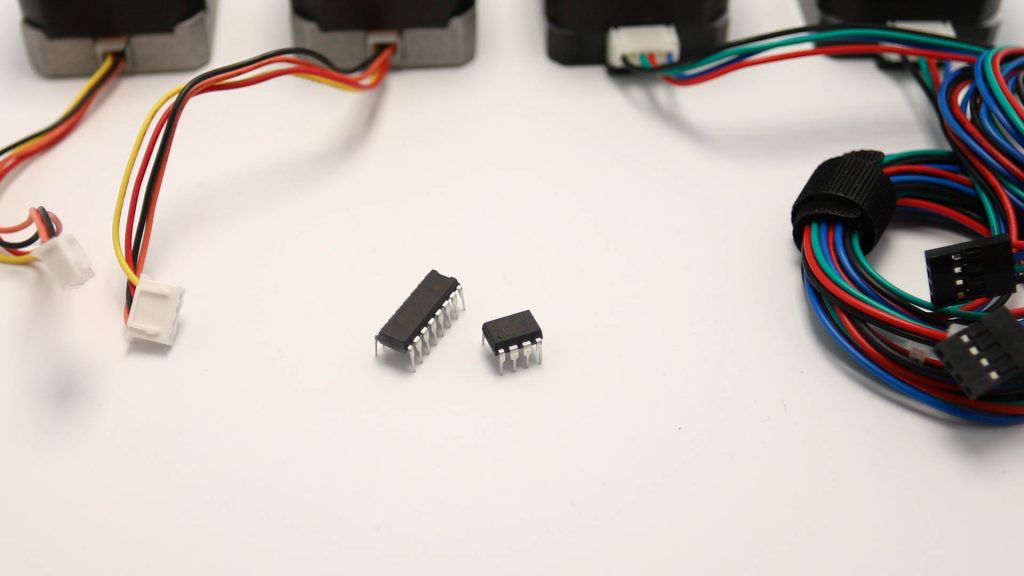
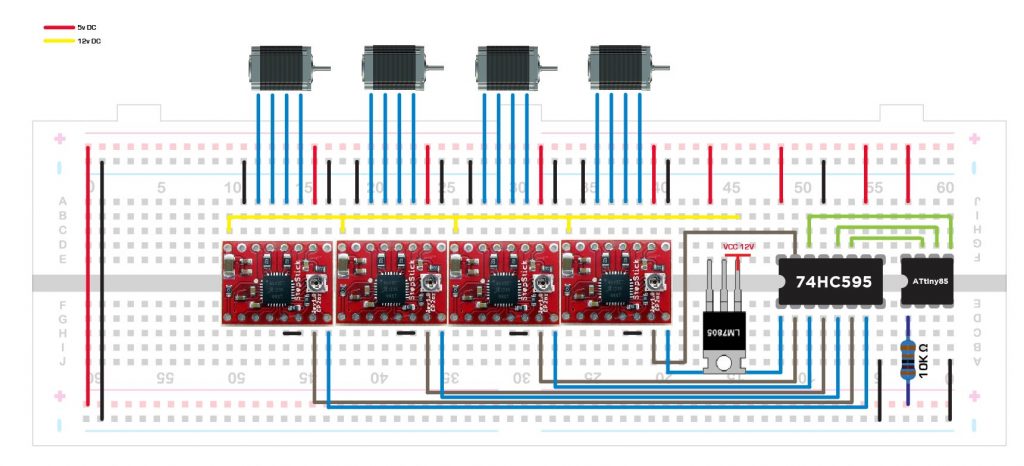
Three pins from the ATtiny85 connect to the 74HC595. The 74HC595 receives data from the ATtiny85 and outputs its 8 bits in parallel (through 8 pins) to four A4988 drivers (two pins each for Pulse and Direction).
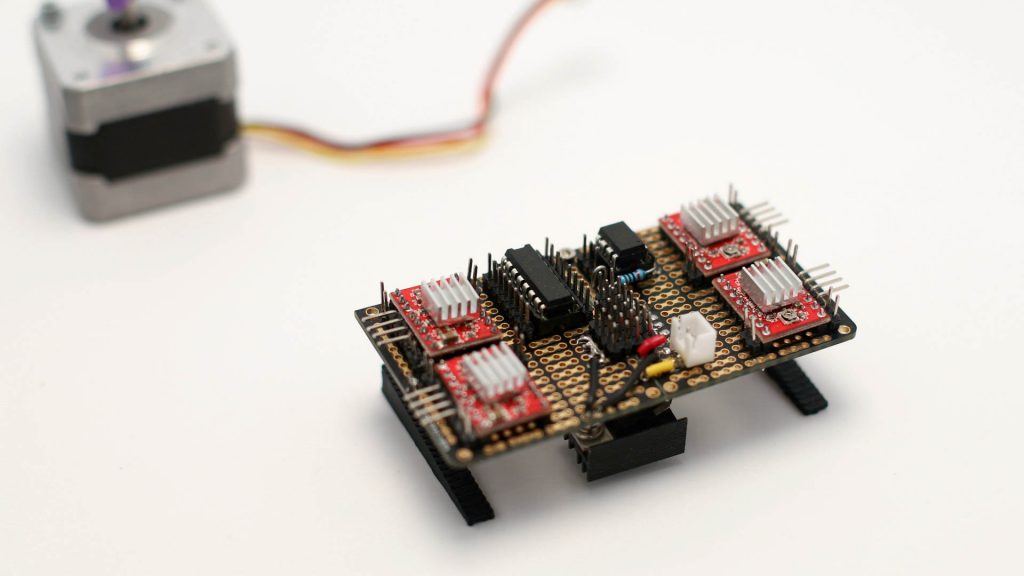
I ditched the breadboard in favor of some PCB strip board from Amazon. The LM7805 voltage regulator and heatsink were mounted on the underside. A 3D-printed stand was used make things presentable.
The same stepperMotor Class is used from the previous example, but it has been modified to write to a byte variable that is then written to the 74HC595.
#define MOTOR_DATAPIN   0 //  3 pins from ATtiny85
#define MOTOR_LATCHPIN  1 //  to the 74HC595
#define MOTOR_CLOCKPIN  2 //  shift register

// These 8 positions correspond to byte motorOutput variable
#define MOTOR_ONE_PUL   0
#define MOTOR_ONE_DIR   1
#define MOTOR_TWO_PUL   2
#define MOTOR_TWO_DIR   3
#define MOTOR_THR_PUL   4
#define MOTOR_THR_DIR   5
#define MOTOR_FOR_PUL   6
#define MOTOR_FOR_DIR   7

// Variable that stores what is sent to the 74HC595 Shift Register
byte motorOutput;

class stepperMotor{
  public:

  void stop(void){
    enable = 0;
  }

  void start(void){
    enable = 1;
  }

  unsigned long steps(void){
    return stepCount;
  }

  void init(int _pulsePin, int _dirPin, unsigned long _delayTime, bool _direction){
    pulsePin      = _pulsePin;
    dirPin        = _dirPin;
    delayTime     = _delayTime;
    direction     = _direction;
    togglePulse   = LOW;
    enable        = 0;
    changeDirection(direction);
  }

  void control(void){
    currentTime = micros();
    if(enable == 1){
      if( (currentTime - deltaTime) > delayTime ){
        togglePulse = togglePulse == LOW ? HIGH : LOW;
        pulseCount++;
        if(pulseCount % 2 == 0){
          stepCount++;
        }
        bitWrite(motorOutput,pulsePin,togglePulse);
        deltaTime = currentTime;
      }
    }
  }

  void changeDirection(bool _direction){
    direction = _direction;
    bitWrite(motorOutput,dirPin,direction);
  }

  void changeSpeed(unsigned long _speed){
    delayTime = _speed;
  }

  private:
  unsigned long delayTime, currentTime;
  unsigned long deltaTime = 0;
  unsigned long pulseCount = 0;
  unsigned long stepCount = 0;
  int pulsePin, dirPin;
  bool direction, togglePulse, enable;
};

stepperMotor stepperOne, stepperTwo, stepperThree, stepperFour;

void setup() {
  pinMode(MOTOR_DATAPIN, OUTPUT);
  pinMode(MOTOR_LATCHPIN, OUTPUT);
  pinMode(MOTOR_CLOCKPIN, OUTPUT);
  digitalWrite(MOTOR_LATCHPIN, HIGH);

  stepperOne.init(MOTOR_ONE_PUL, MOTOR_ONE_DIR, 600, LOW);
  stepperTwo.init(MOTOR_TWO_PUL, MOTOR_TWO_DIR, 600, LOW);
  stepperThree.init(MOTOR_THR_PUL, MOTOR_THR_DIR, 600, LOW);
  stepperFour.init(MOTOR_FOR_PUL, MOTOR_FOR_DIR, 600, LOW);

  delay(2000);

  // This will start ONLY motor one
  stepperOne.start();
}

void loop() {
  stepperOne.control();
  stepperTwo.control();
  stepperThree.control();
  stepperFour.control();

  // Your code goes here.

  // This updates the Shift Register Values in each loop
  digitalWrite(MOTOR_LATCHPIN, LOW);
  shiftOut(MOTOR_DATAPIN, MOTOR_CLOCKPIN, MSBFIRST, motorOutput);
  digitalWrite(MOTOR_LATCHPIN, HIGH);
}
The bitWrite() function is taking the place of digitalWrite() and the stepper drivers do not receive the HIGH/LOW pulse until the shiftOut() function is called at the end of each loop().
When one motor needs to move, its driver receives a HIGH/LOW toggle, but motors that don’t move will hold whatever HIGH/LOW value it had, thus the motor will remain stationary, despite the shift register outputting the entire 8-bit value to all the drivers. Catfish?
Final thoughts…
Using a class is completely optional. My stepper code started out in life as a jumble of functions and separate variables for each stepper motor. Eventually, I gravitated towards using a C++ class because it scales better.
The A4988 driver is great for prototyping and for simple projects, but it has limitations. When you need a lot of torque and/or speed for your project, more expensive drivers like the DM556T may be more appropriate. The DM556T is my go-to driver.

